This blog post is the second in a series to teach about the build tools ProGuard and R8, and the first in the hands-on portion of the series. In the first post I talked about the Android Build Pipeline. In this blog, I would like to actually reinforce those concepts with hands on exercises. If you haven’t read the first blog on this topic, this is part two in that series, so I highly suggest going back and understanding that material first.
All files for this blog can be found on my GitHub page at dustinsummers/understanding-proguard-and-r8
In this lesson we will be looking at the first two files from that repository, and I will be demonstrating how code gets from .java files all the way to .dex, and discuss how to actually read the resulting .smali (the human readable format of dex or dalvik byte code).
Test File 1
Basic Java/Kotlin Compilation
For our first step, we are going to walk through compiling java source code, which should be a COMPSCI-101 refresher, but it serves as a good refresher. This will be turning our java source code(or Kotlin) into java byte code, and relates to this part of the build pipeline as discussed in Part 1 of my blog.
This is assuming that you have javac (Java compiler) installed and the path set for javac.
For instructions on doing so, follow this link.
Now let’s look at TestFile1.java located here:
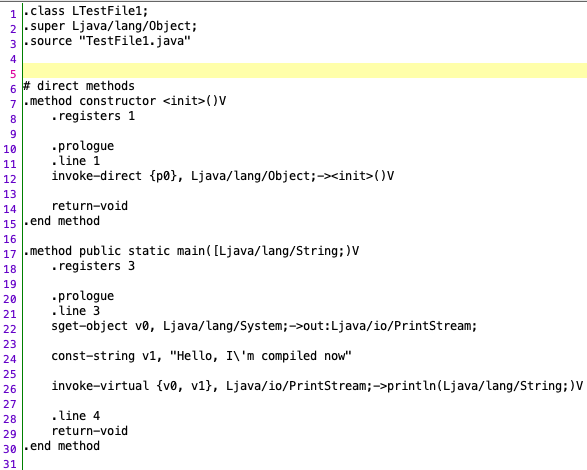
class TestFile1 {
    public static void main(String[] args) {
        System.out.println("Hello, I'm compiled now");
    }
}
To compile, run the following command on this file.
$ javac -source 1.7 -target 1.7 TestFile1.java
If you look at the contents of the folder, you will see that you now have a compiled version of your file called TestFile1.class.
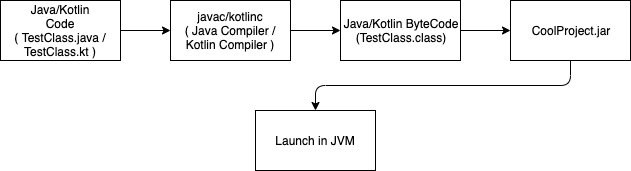
Now, to reiterate what I mentioned in the lesson before, typical Java applications launched in the Java Virutal Machine(JVM) only need the .class files to be able to run. They will look for the .class with the main method, and launch that file.
In this instance, since we only had the one file, we can just point java to this file and it will run it inside of the JVM.
$ java TestFile1
Hello, I'm compiled now
Congratulations!!!

I kid, but great job following along so far!
Turning .class into .dex
Setting up build tools
So for these next steps, we will be turning our .class files into a .dex file. To do this, we need the Android Build Tools to continue further.
(Note: This assumes you have Android Studio installed, which should setup most of your build environment).
First, let’s check that our ANDROID_HOME variable is setup. If you have worked with Android in the past, this has most likely already been done, but you can test it by typing the following into your terminal:
$ echo $ANDROID_HOME
We need to ensure that we have a pointer to our build-tools directory within the SDK. This directory has a number of resources to assist in building Android applications. You can either just put this directory on your path, or create a separate variable. (Below I put it on my $PATH).
Also, check which version of the build-tools lives in your SDK. For me, I currently have 29.0.2. (as of 11/02/2019)
If build-tools is not on your path, you can add it by doing the following (also included instructions on adding ANDROID_HOME below, so skip those if you have it).
$ export ANDROID_HOME=/path/to/my/sdk (on mac this is typically ~/Library/Android/sdk/)
$ export PATH=$PATH:$ANDROID_HOME/build-tools/29.0.2/
Test that the path worked by running dx --version (You may need to restart your terminal.)
$ dx --version
dx version 1.16
Build using DX
So, going back to Part 1, this is the build pipeline that we are now focusing on. (Notice the addition of the DEXing portion in the middle)
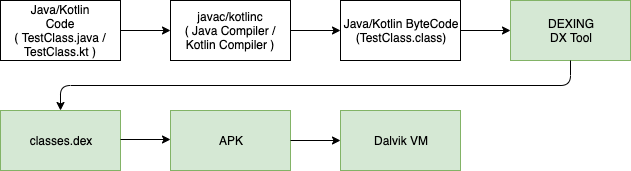
The DEXing process will be converting our .class files into a single .dex file, or our Java Byte Code into Dalvik Byte Code.
To do that, run the following:
$ dx --dex --verbose --output=classes.dex TestFile1.class
processing TestFile1.class...
Now if you list the contents of the folder you should see the following:
$ ls -l
 TestFile1.class
 classes.dex
 TestFile1.java
Awesome!
Now you may be asking yourself what is inside of the .dex. Well, lucky for you I’m going to explain that!
Inside of the build-tools folder is another tool called dexdump.
Running that will provide us the contents of our .dex file. Since this was a fairly simple Hello,World Java example, I want us to break down how to actually read the resulting .dex file, so that as we get more complex examples, it becomes more apparent what is happening.
Below is the dump of our .dex file.
$ dexdump -d TestFile1.dex
Processing 'TestFile1.dex'...
Opened 'TestFile1.dex', DEX version '035'
Class #0            -
  Class descriptor  : 'LTestFile1;'
  Access flags      : 0x0000 ()
  Superclass        : 'Ljava/lang/Object;'
  Interfaces        -
  Static fields     -
  Instance fields   -
  Direct methods    -
    #0              : (in LTestFile1;)
      name          : '<init>'
      type          : '()V'
      access        : 0x10000 (CONSTRUCTOR)
      code          -
      registers     : 1
      ins           : 1
      outs          : 1
      insns size    : 4 16-bit code units
000130:                                        |[000130] TestFile1.<init>:()V
000140: 7010 0300 0000                         |0000: invoke-direct {v0}, Ljava/lang/Object;.<init>:()V // method@0003
000146: 0e00                                   |0003: return-void
      catches       : (none)
      positions     :
        0x0000 line=1
      locals        :
        0x0000 - 0x0004 reg=0 this LTestFile1;

    #1              : (in LTestFile1;)
      name          : 'main'
      type          : '([Ljava/lang/String;)V'
      access        : 0x0009 (PUBLIC STATIC)
      code          -
      registers     : 3
      ins           : 1
      outs          : 2
      insns size    : 8 16-bit code units
000148:                                        |[000148] TestFile1.main:([Ljava/lang/String;)V
000158: 6200 0000                              |0000: sget-object v0, Ljava/lang/System;.out:Ljava/io/PrintStream; // field@0000
00015c: 1a01 0100                              |0002: const-string v1, "Hello, I'm compiled now" // string@0001
000160: 6e20 0200 1000                         |0004: invoke-virtual {v0, v1}, Ljava/io/PrintStream;.println:(Ljava/lang/String;)V // method@0002
000166: 0e00                                   |0007: return-void
Using the build-tools script dexdump is a quick way to view the human readable version of Smali and it comes packaged with the Android SDK which is nice. But as you start dealing with larger .dex files, this is not the best tool for the job. Remember, the goal of dx is to shove as many of those .class files as it can into one file, so these files can get rather cumbersome when dealing with more complex projects.
Another tool you can use is jadx, along with the jadx-gui which is a pretty common tool used in the reverse engineering world to view dalvik bytecode/smali.
If you have homebrew as your package manager, you can use brew install jadx or brew install jadx-gui to get started using this tool, or follow the instructions listed on the github page.
Now back to the Smali. The only parts of this file that are actually detailing what is happening are the lines towards the bottom that are all proceeded with a |####: . Viewing this in jadx-gui is a way to strip out all of the superfluous information.
Below is an image of that:
I am just providing you different options for viewing the same content, so feel free to choose your own adventure here. Moving forward, I will use a combination of jadx, dexdump, and Sublime with Smali syntax highlighting interchangeably.
But what is Smali? And how do you read it?!
Continue on, my friends!
Quick Lesson on Reading Smali
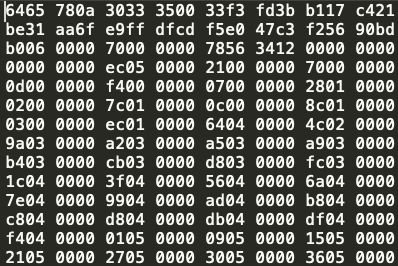
Dalvik ByteCode is what makes up a .dex file. And by bytes, I literally mean bytes. If you just look at a .dex file without running a program on it to convert it to smali, it looks like this.
Each one of those bytes maps to a Dalvik OpCode(Operation Code). Here are two great resources for reading up on the different Dalvik OpCodes here and here. Even when reading Smali, I find the best way to learn is by following line by line what’s taking place and comparing those against the Dalvik OpCodes.
But instead of breaking out these bits and bytes by hand, we can use tools like dexdump which handles that processing for us.
So now a lets learn a little about the actual language and formatting of Dalvik Byte Code. The Dalvik Virtual Machine(DVM) is a register-based Virtual Machine, as opposed to the Java Virtual Machine(or JVM), which is stack-based. You can think of register’s as local variables. They are designed to run on machines with low-memory as they do do not want to be held in memory for long. You can see this in the declaration of v0 and v1 below.

sget-object is essentially getting the Object that is referenced in field@0000 that we will be using later on(in this instance it is the System.out Object), and placing that into the v0 variable.
We are then setting a const-string v1 equal to Hello, I’m compiled now.
Next we are calling invoke-virtual. invoke-virtual is used to invoke a method that is not private/static/final or a constructor (here it is a method in the System.out family). With invoke-virtual, we are passing in our two registers/variables declared above, v0 and v1, and then calling the method println.
At the end we return-void because our method call does not return anything. This just informs the system that we are finished with this method. The two variables set can be reused throughout the rest of the .dex file as those resources are no long required.
And that’s it! Clear as mud!
Here are a couple other things to keep in mind about Dalvik that are good to know as we continue down the Android Build Pipeline:
-
Unlike a JVM’s, DVM’s are designed to run multiple instances. So each application on your phone has it’s own instance of a DVM running. This is what provides the “sandbox” instances for each application, adding to the overall security of Android.
-
For constants in your app (i.e. variables/methods declared using
public static finalorconst val), they are contained in a constant pool per application. This means all of those individual references are declared as separate registers in the DVM (or additionalv0’s andv1’s).
Test File 2
Combining multiple .class files into one .dex
So for the next file, I’m going to show how multiple .class files are converted into one .dex file. Here are the contents of TestFile2.java located here.
class TestFile2 {

    interface PostMan{
        void letterTime(Message message);
    }

    static class Messenger implements PostMan{
        @Override
        public void letterTime(Message message) {
            System.out.println("Sending a message: " + message.getMessage());
        }
    }

    public static void main(String[] args) {
        sendMessage(new Messenger());
    }

    private static void sendMessage(Messenger messenger){
        messenger.letterTime(new Message("I'm implementing interfaces!!"));
    }
}

class Message{
        public Message(String message){
            this.message = message;
        }

        private String message;

        public void setMessage(String newMessage){
            this.message = newMessage;
        }

        public String getMessage(){
            return this.message;
        }
}
So this class is an overly complicated “Hello World” example using multiple classes, an interface, and String Concatenation to demonstrate a couple examples:
- Although these classes/interface are declared in the same
.javafile, the Java Compiler (javac) breaks them up into separate.classfiles. - These classes will all get combined back together into one
.dexfile once we run it through thedxtool.
First, let’s compile the file:
$ javac -source 1.7 -target 1.7 TestFile2.java
And now let’s look at the contents of our folder:
$ ls -l
Message.class
TestFile2$Messenger.class
TestFile2$PostMan.class
TestFile2.class
TestFile2.java
So real quick, we have the Message.class which is the Message Object we created.
We have TestFile2.class which contains our main function and the sendMessage(Messenger messenger) function.
And inside of TestFile2 we also have one interface PostMan and a Messenger class that implements PostMan.
Note: The $ after TestFile2 represents “inner classes”. For Example, the TestFile2$Messenger.class. This is important down the road when looking at ProGuard or R8 output.
We can run java TestFile2 and see the output from the code above:
$ java TestFile2
Sending a message: I'm implementing interfaces!!
OK! Time to run our DEXing tool and look at the output.
$ dx --dex --verbose --output=classes.dex *.class
processing Message.class...
processing TestFile2$Messenger.class...
processing TestFile2$PostMan.class...
processing TestFile2.class...
Now you should see the same classes.dex file from before, but this one is filled with a lot more content, so I would suggest outputting the dump to a text file.
But as you can see, all of the .class files were combined into the one .dex file!
Pretty nifty! But let’s actually look inside of this classes.dex file…
$ dexdump -d classes.dex > TestFile2_dump.smali
Note: Adding .smali annotation at the end will allow any editor that supports .smali to apply syntax highlighting. Doesn’t work when formatting output from dexdump.
Since this file was slightly more complex, I want to do a deep dive into it. Moving forward, I will only be highlight those items that are vastly different from what I am about to go into now.
First, let’s look at how the .dex file handled our Message Object…
Message Object
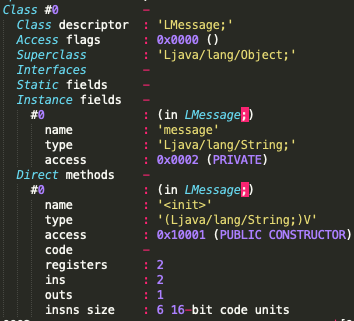
Class #0 is our Message Object. Inside of this Object we can see the Instance fields being declared for our private String message object.
The Direct Methods section highlights the public constructor that’s being initialized. Direct Methods refer to any static, private, or constructor object in the code associated with this class.
The Virtual Methods section highlights our setter and getter methods, which I will walk through now.
Message Object Getter/Setters


The first block ([0002ac]) shows the operations for our constructor. We are first calling invoke-direct on the constructor object {v0}. But notice our constructor object is receiving an initialization variable. So we place that new String into an iput-object labeled v1.
The getMessage is setting v0 equal to v1 (our variable declared in our constructor) and then returns v0.
The setMessage is setting v1 equal to v0, or whatever was just passed in to this virtual method.
Feel free to take your time studying this, and please reach out if you have questions on the above. Looking at lower level languages can sometimes be like trying to read someone elses REGEX, so feel free to study it or write it down as much as you have to until it sinks in.
PostMan Interface and Messenger Class
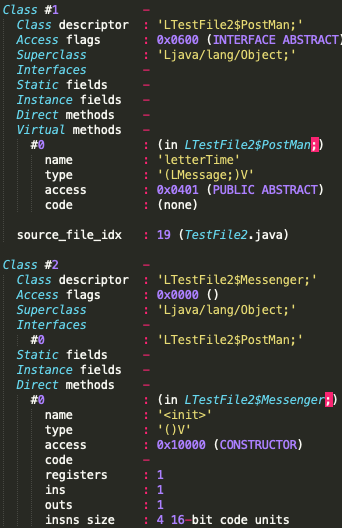
The PostMan interface is declared as Class #1 and defined as a Public Abstract Interface. You can also see that the letterTime method is declared but has no associated code under Virtual Methods.
The Messenger class (Class #2) is shown as declaring PostMan as an interface, and there is some code to invoke our constructor that is pretty similar to the Message Object constructor shown above.
But in this section, we can see the code associated with letterTime, so let’s break that down. Just to refresh your memory and prevent you from having to scroll up, here is the original method:
static class Messenger implements PostMan{
        @Override
        public void letterTime(Message message) {
            System.out.println("Sending a message: " + message.getMessage());
        }
    }
And here is the Smali Representation of it:
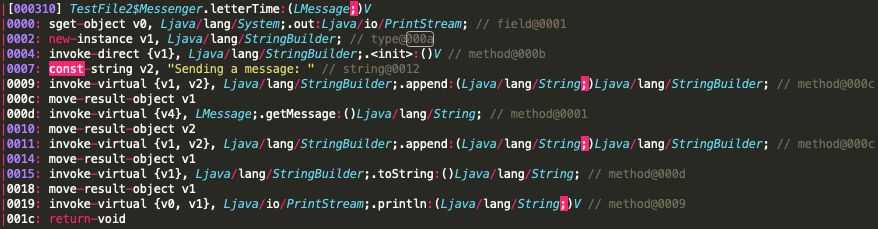
Let’s do a line-by-line of what the Smali is doing.
- [0000] First, we get the System.out object and set that equal to
v0. - [0002] Then, we declare an instance of the
StringBuilderclass and set that equal tov1. - [0004] Since
StringBuilderneeds to be initialized, the next line is calling the constructor for it. - [0007] Set our
String“Sending a message: " tov2. - [0009] Next, call
appendon ourStringBuilder, which will essentially build an array under the hood with ourStringvalue declared inv2and prepare it to be added to later on. - [000c] Put this newly created
StringBuilderobject intov1. - [000d] Call
Message.getMessageto receive our String and…. - [0010] Set that
Stringretrieved in the previous line tov2. (Remember, we cleared out our “Sending a message: " earlier that was originally set tov2) - [0011 - 0018] Essentially does the same procedure as above, but appends the two
Stringstogether, then calls.toStringto turn those back into a straightStringobject. It then sets the newly created String back tov1. - [0019] And finally, call
System.out.printlnon our String.
Phew! That was a lot just for a simple String concatenation and print out. But hopefully that quick walk-through makes reading Smali a little less intimidating. I won’t be doing that moving forward unless it is something that is slightly bizarre or different from what’s described above.
Note: Notice above how often Dalvik is rewriting over registers. This is to save on that memory footprint and not hold on to too many items in memory at any point in time.
The following TestFile2 main method and sendMessage method I won’t bother going into as they are relatively straightforward and similar to what was discussed previously.
Here is the resulting smali for those. The one interesting part here is that you can you see our Messenger class’s Virtual Method being invoked here.


Recap
In this lesson, we went over the following:
- Compiling
.javafiles into.classfiles - Converting a single
.classfile into one.dex - Converting multiple
.classfiles into one.dex - Reading Smali, and resources for doing so
To Be Continued…
In the next hands on portion, we will go over how ProGuard fits into the mix and the various manipulations that it does to the Java Byte Code.
ProGuard implementation is a fairly meaty topic and is important by itself, so I didn’t want to squeeze it into the end of this blog for fear of it being overlooked.
So the next post will literally be all ProGuard manipulations and looking at byte code before and after ProGuard.
I hope you enjoyed this post, and as always, feel free to reach out to me on Twitter @DustNSummers or post below in the comments.
Stay Tuned, and happy coding!