As a Software Engineer, knowing how to set up a solid CI/CD Pipeline for your project is a vital skill. Whether you’re starting a side project or working on a well established project, having a solid CI/CD pipeline is going to enable you or your team to move faster.
The end goal is to protect your branches and ensure only quality code makes it in that passes your status checks.
For me, I want to ensure new code merging into my main branch is passing ALL Unit and UI Tests, and prevent code smell creep using tools such as CheckStyle (for legacy java files), Detekt, and Lint to block code with violations from auto-merging in.
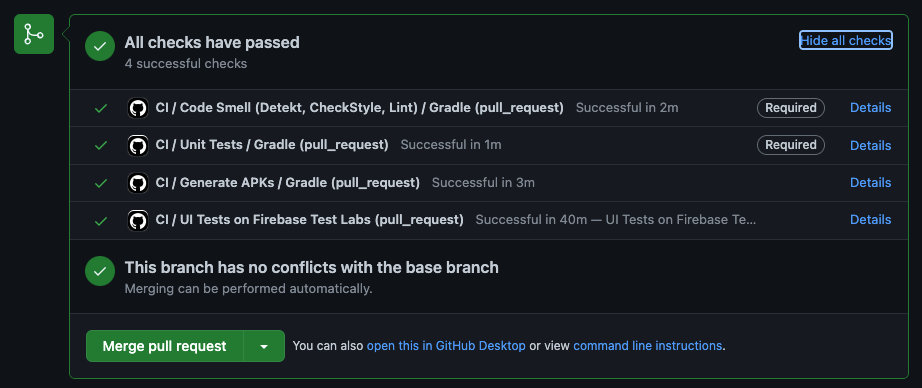
The desired end state will look something like below. When a pull request is opened into my main branch (for me that’s develop), it will automatically kick off the below checks.
I’m not one to belabor a point, and let’s be honest, you’re not really even going to read this. You’re going to skip to the meat and potatoes of this post. So let’s just do that.
Requirements
- Android project on GitHub
- Firebase hooked up with your project (for things like Crashlytics/Analytics)
- We will need to leverage the same
google-services.jsonfile used for these services later on.
- We will need to leverage the same
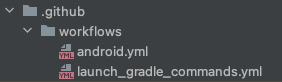
At the root level of your project, add the following directory and files:
.github/workflow/android.yml
.github/workflow/launch_gradle_commands.yml
Below is what you will paste inside of the respective .yml files. Don’t worry, you can trust me :)
Also, I’ll go over what these files are doing in the following steps in case you DON’T trust me for whatever reason.
android.yml
name: CI

on:
  push:
    branches: [ develop ]
  pull_request:
    branches: [ develop ]

jobs:
  codesmell:
    name: Code Smell (Detekt, CheckStyle, Lint)
    uses: ./.github/workflows/launch_gradle_commands.yml
    secrets:
      GOOGLE_SERVICES: ${{ secrets.GOOGLE_SERVICES }}
    with:
      commands: lint detekt checkstyle

  unitTest:
    name: Unit Tests
    uses: ./.github/workflows/launch_gradle_commands.yml
    secrets:
      GOOGLE_SERVICES: ${{ secrets.GOOGLE_SERVICES }}
    with:
      commands: testReleaseUnitTest

  generateApks:
    name: Generate APKs
    uses: ./.github/workflows/launch_gradle_commands.yml
    secrets:
      GOOGLE_SERVICES: ${{ secrets.GOOGLE_SERVICES }}
    with:
      commands: assembleMockClientDebug assembleMockClientDebugAndroidTest
      uploadArtifacts: true

  uiTests:
    name: UI Tests on Firebase Test Labs
    needs: generateApks
    runs-on: ubuntu-latest

    steps:
      - uses: actions/checkout@v2

      - name: Download App Debug APK
        id: app-debug-download
        uses: actions/download-artifact@v2
        with:
          name: app-debug

      - name: Download Android Test APK
        id: android-test-download
        uses: actions/download-artifact@v2
        with:
          name: android-test

      - name: Login to Google Cloud
        uses: google-github-actions/setup-gcloud@v0
        with:
          service_account_key: ${{ secrets.GCLOUD_AUTH }}

      - name: Set current project
        run: gcloud config set project ${{ secrets.FIREBASE_PROJECT_ID }}

      - name: Run Instrumentation Tests in Firebase Test Lab
        env:
          APP_DEBUG_LOCATION: app-mock-client-debug.apk
          ANDROID_TEST_LOCATION: app-mock-client-debug-androidTest.apk
          DEVICE_MODEL: Nexus9,version=24,locale=en,orientation=landscape
        run: gcloud firebase test android run --type instrumentation --app $APP_DEBUG_LOCATION --test $ANDROID_TEST_LOCATION --device model=$DEVICE_MODEL --use-orchestrator --num-flaky-test-attempts 2
launch_gradle_commands.yml
name: Gradle Executable Environment

on:
  workflow_call:
    inputs:
      commands:
        required: true
        type: string
      uploadArtifacts:
        required: false
        type: boolean
    secrets:
      GOOGLE_SERVICES:
        description: 'google-services.json for building app'
        required: true

jobs:
  launch_gradle_commands:
    name: Gradle
    runs-on: ubuntu-latest

    steps:
      - uses: actions/checkout@v2
      - uses: actions/setup-java@v2
        with:
          distribution: temurin
          java-version: 11

      - name: Write compile time google-services.json file
        env:
          GOOGLE_SERVICES: ${{ secrets.GOOGLE_SERVICES }}
        run: echo $GOOGLE_SERVICES > app/google-services.json

      - uses: gradle/gradle-build-action@v2
        with:
          gradle-version: current
          arguments: ${{ inputs.commands }}

      - name: Uploading App Debug Build
        if: ${{ inputs.uploadArtifacts }}
        uses: actions/upload-artifact@v2
        with:
          name: app-debug
          path: app/build/outputs/apk/mockClient/debug/app-mock-client-debug.apk
          if-no-files-found: error

      - name: Uploading Android Test Build
        if: ${{ inputs.uploadArtifacts }}
        uses: actions/upload-artifact@v2
        with:
          name: android-test
          path: app/build/outputs/apk/androidTest/mockClient/debug/app-mock-client-debug-androidTest.apk
          if-no-files-found: error
Boom!
At this point, you could just copy and paste the above two .yml files and 90% of the work is complete in regards to having a working CI/CD Pipeline. The rest of these steps really are just toggling a few things on to make sure the UI Tests work as well as ensuring that our pipeline “blocks” PR’s until all of these checks pass, which really is the whole point of a CICD Pipeline… to ensure only code that meets your standards makes it into the code base.
So let’s quickly breakdown these files, starting with the android.yml file.
Android.yml File Breakdown
Starting from the top of the android.yml file, here we go.
name: CI

on:
  push:
    branches: [ develop ]
  pull_request:
    branches: [ develop ]
These first few lines are standard GitHub Action lines and are telling it WHEN to kick off the following list of jobs. Here we are saying on Push or PR’s to our develop branch, but you can replace this with w/e you want.
jobs:
  codesmell:
    name: Code Smell (Detekt, CheckStyle, Lint)
    uses: ./.github/workflows/launch_gradle_commands.yml
    secrets:
      GOOGLE_SERVICES: ${{ secrets.GOOGLE_SERVICES }}
    with:
      commands: lint detekt checkstyle
So this is where we start to see some interesting items.
As you can see, this is where we start telling GitHub actions WHAT to actually do. Our first job is codesmell, which will run the submitted PR through our various codesmell checks to ensure it meets common styleguide.
If you want to read more about these individual static analysis tools, see below:
- Lint: Ensure code has no structural problems
- Detekt: Enforce kotlin code to adhere to a coding standard
- CheckStyle: Enforce Java code to adhere to a coding standard
** Note: You will need to configure each of these checks individually to “fail” on violations in order to actually fail the CICD pipeline. See the documentation above for further guidance, or reach out :)
You may be asking, “But how exactly am I kicking off these checks?” With that, we will need to do a little detour over to our other .yml file.
-=-=-==-=-=-=-=-=-=-=-=-=-=-=-=-=-=-
Launch Gradle Commands .yml File Breakdown
Let’s take a look at our launch_gradle_commands.yml file to understand how it works:
name: Gradle Executable Environment

on:
  workflow_call:
    inputs:
      commands:         # String representing the Gradle commands to launch.
        required: true  #   What you would pass in when calling './gradlew', for example './gradlew lint'
        type: string
      uploadArtifacts:  # Boolean value indicating whether or not we should upload artifacts generated from this command
        required: false #  Only used when actually building '.apk' files
        type: boolean
    secrets:
      GOOGLE_SERVICES:  # Our google-services.json file, which we have loaded into GitHub Secrets
        description: 'google-services.json for building app'
        required: true
Much like our previous android.yml file, this portion of the file establishes our WHEN. Unlike the previous file which was launched on a push or a pull request to a certain branch, this one specifically only launches when the workflow itself is called, hence the on: workflow_call:.
But unlike our previous command, this one actually establishes a few inputs, or arguments which need to be passed in with the call to this workflow. You can read the comments above next to the inputs to see what each is used for.
Now let’s start breaking down the steps for the launch_gradle_commands.yml file.
steps:
      - uses: actions/checkout@v2    # Dependencies for setting up other actions
      - uses: actions/setup-java@v2  # Sets up Java for this environment
        with:
          distribution: temurin
          java-version: 11
This one is pretty straight forward. Onward!
-=-=-==-=-=-=-=-=-=-=-=-=-=-=-=-=-=-
Write compile time google-services.json step
- name: Write compile time google-services.json file
        env:
          GOOGLE_SERVICES: ${{ secrets.GOOGLE_SERVICES }}      # Uses the input provided from this job
        run: echo $GOOGLE_SERVICES > app/google-services.json  # Compile time google-services.json file provided
As an Android developer, you should never commit your google-services.json file to your repo, since that contains some of the keys to your kingdom which should be kept secret.
As a result, when trying to build/run actions against your project that has any Google service as a dependency, it will most likely fail with the following error:
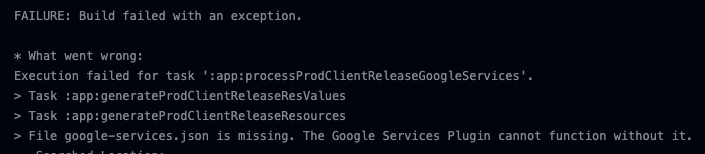
To get around this issue, you need to add the contents of your google-services.json file to your projects Secrets so that you can access them during the build process.
To access your projects secrets in GitHub, just go to your repository, and as long as you have the access, you should be able to go to Settings -> Secrets -> New Repository Secret
The secrets for this workflow that are required are listed below:
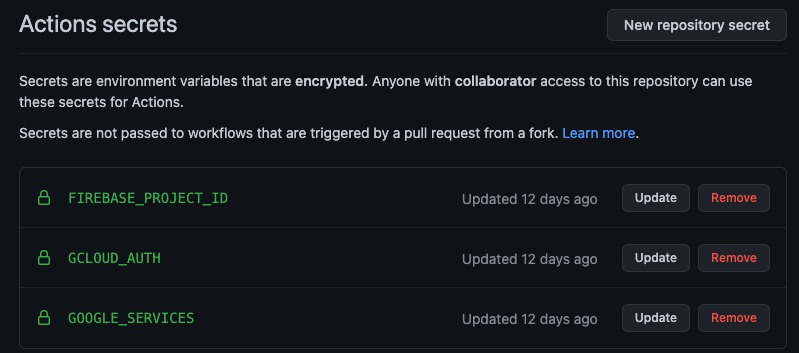
What are these individual secrets?
-
GOOGLE_SERVICES: This is the
google-services.jsonfile previously mentioned -
GCLOUD_AUTH: This is an authorization token required by Firebase Test Labs in order for us to launch the tests. How would you obtain such a token? For this one, I actually had to refer to a VERY similar blog post to this one that I’m writing. The author, Wojciech Krzywiec, does a great job at breaking down these steps in the “Step 3. Run tests on Firebase Test Lab Job” that are going to be better detail than I can go into. Github Actions Firebase Test Lab. Basically you need to acquire this token, just base64 encoding on the file, and then uploading that resulting file to GitHub to use during the authentication step of the process.
-
FIREBASE_PROJECT_ID: This is the name of the project inside of Firebase. You should be able to pull that from the FireBase dashboard.
Now with these secrets loaded into GitHub, our GitHub Actions can leverage those at compile time, which is pretty awesome.
Running Gradle Commands
To actually run the commands, which one could argue is the sole purpose of the launch_gradle_commands.yml file, I am leveraging a separate GitHub action to do so, gradle-build-action. This GitHub action is built by the gradle team themselves, so you can’t really top that.
- uses: gradle/gradle-build-action@v2
        with:
          gradle-version: current
          arguments: ${{ inputs.commands }}
Essentially all this GitHub Action requires is that the “commands” be passed in, which is one of the inputs to this yml file that are required. You can see that when I call this command, I pass in a string which points to the command you want to use.
Optional Upload of File
The first two gradle calls I make in my calls are pretty similar. They are the lint detekt checkstyle call and the testReleaseUnitTest call.
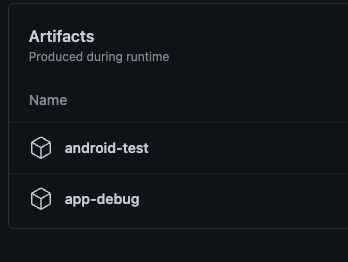
assembleMockClientDebug assembleMockClientDebugAndroidTest are the first calls that leverage the uploadArtifacts boolean variable. Since we are building .apks during this step to be used for testing later on, we need to be sure to retain those artifacts. By “uploading” them, this is actually going to store those artifacts inside of that particular pipeline job. The nice thing about this is if you ever need to go back and inspect or test out locally those APK’s, they are available here for you to use.
Bouncing back to android.yml file
So now let us start to tie all of this back together. At a high level, the android.yml file is accomplishing the following:
- Run Code Smell Checks
- Run Unit Tests
- Build APK’s used for UI tests
- Setup GCloud Environment used for FireBase Test Labs
- Send APK’s to FireBase Test Labs
The first three steps I described above in the previous file (for the most part).
Now let’s take a look at the steps inside of the uiTests job.
The first thing it is doing is downloading the apk’s that we uploaded in the generatedApks job.
- name: Download App Debug APK
        id: app-debug-download
        uses: actions/download-artifact@v2
        with:
          name: app-debug

      - name: Download Android Test APK
        id: android-test-download
        uses: actions/download-artifact@v2
        with:
          name: android-test
The reason I personally took this approach was to have a way to retain those artifacts for a local build if, for whatever reason, the tests came back with something I was not expecting. Another reason is, frankly, I could not figure out how to retain the artifacts built in a previous step to pass to the next :P.
For small projects, this is not a huge deal. For larger organizations with hundreds of contributing developers, this method might not scale well, so feel free to throttle this as you see fit.
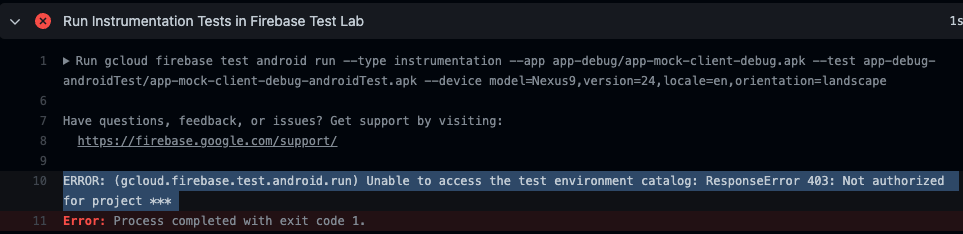
Authorizations Required in Firebase and Google Cloud
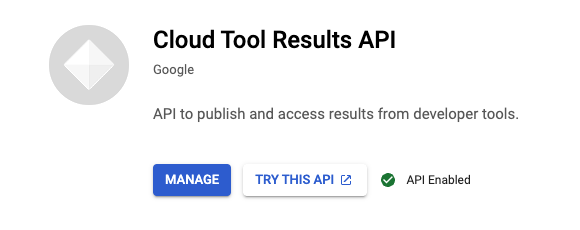
The next step is to get our gcloud environment setup. I ran into a couple errors related to roles that needed to be modified to have “Edit” access as well as enabling of the Cloud Tool Results API.
One error stated that Cloud Tool Results API has not been used in project ######## before or it is disabled It will provide a link for you to enable it.
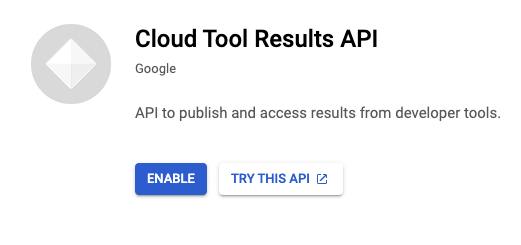
Just click the button :)
The only other error I ran into was around permissions for a specific role.
That was also a relatively easy fix after a quick google search.
Just locate that specific role, and change it to the following:

Now you’re off to the races.

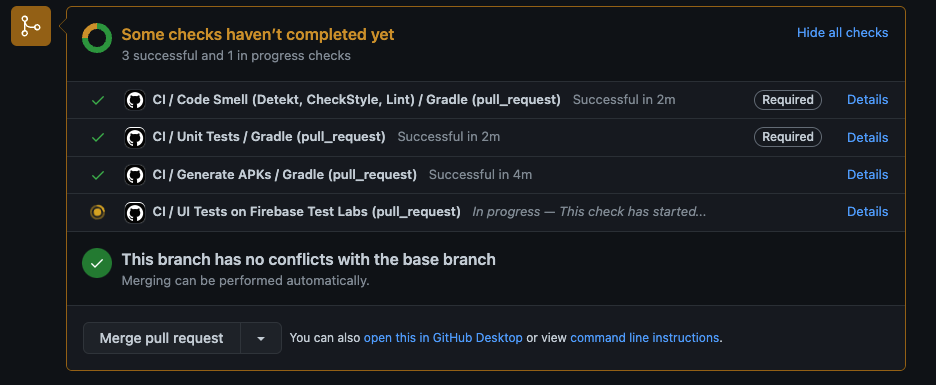
Setting Required Steps in CICD Pipeline
This is the fun part. This is what all your hard work was for. Now you can actually start to tie this up to where you can block PR’s that violate one of your checks from being able to automatically merge in.
First, let’s navigate to your Branch Protection rules on GitHub. To get there, click on Settings -> Branches -> then click the Edit button for the Branch Protection Rules.
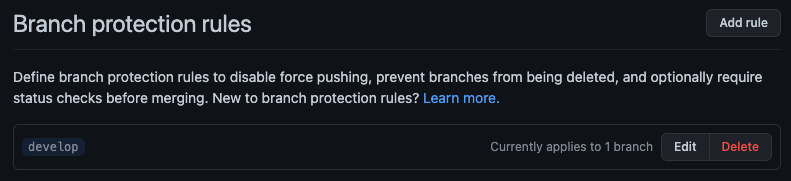
Inside of here are a ton of cool settings that I will let you tinker with. For now, I’m just concerned with the “Require status checks before merging” protection.
This is where you can enter in the custom GitHub Actions that you created in order to actually REQUIRE them to pass before allowing any changes to merge.
This is a really nice feature if you are in a large or small organization and want to ensure you have quality control of code going into the code base.
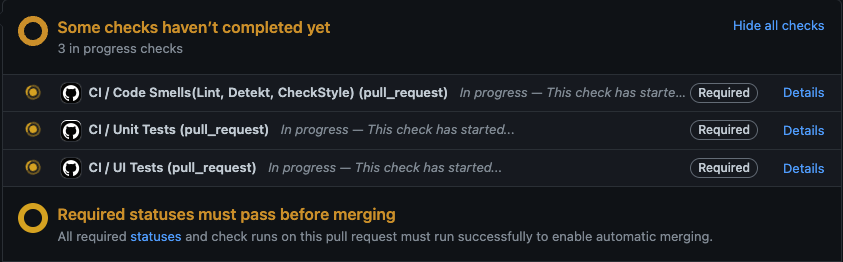
If you don’t mark this as “required”, the CI/CD pipeline can kick off but as long as there are no merge conflicts, the developer could still merge it in.
For instance, if I left off the UI checks like so:

It woud look like so:
That’s no bueno.
Check out your tests!
A post wouldn’t be complete without being able to see your beauty in action.
Witness the beauty that is my flaky tests being launched in a continuous, autonomous fashion.
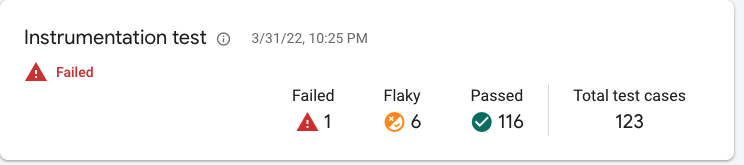
Hey, don’t judge… we are all works in progress.
Was it some recent code that broke my tests? Probably, but for now, all I care about is that I have a reliable way to run my tests. And that is worth celebrating.
Finally
Well hopefully that was clear as mud and you learned something along the way. If you didn’t, leave a comment. If you did, leave a comment. If you have a question, leave a comment.
Either way, thank you for reading, and happy CI/CD’ing!